
Preventing leaks where windows meet siding requires properly connected flashing and a clear path for water to drain outside. At Tevelde & Co., our window evaluations include the condition of the existing frame and the surrounding wall. We look for soft wood, staining, and signs that the sill has been taking water. We also check how the exterior trim meets the siding. Those findings help determine whether the opening needs a localized repair or more extensive work. For an Omaha homeowner, that distinction affects both the project scope and the installation method. A sound window surrounded by damaged flashing presents a different repair from a window sitting in a deteriorated frame.
What We Check During a Window Leak Inspection
The condition of the existing opening shapes our recommendation. During an evaluation, we look for past leak paths around the frame and check interior clues, including peeling paint near the sill and moisture stains below the corners. We also evaluate access. Some exterior trim is suitable for removal and reuse. Brittle or damaged trim requires a different plan. The siding material and the condition of the wall’s weather barrier affect how the flashing is repaired.
Homeowner Tip: Water after a long, steady rain gives us different information from water that appears only during a storm with strong wind. Photos taken while the area is wet are useful, especially if the stain fades between storms.
Following the Water Beyond the Stain
The wet spot inside helps locate the affected area, but water also travels behind trim and along framing. For example, consider a stain beneath the lower left corner of a window. The entry point could be above the window, with water traveling down before it becomes visible. In that situation, the inspection needs to include the head flashing and siding above the opening. That is why our window leak repair guidance addresses the surrounding wall as well as the window itself.
How Flashing Should Connect to the Wall Around Your Window
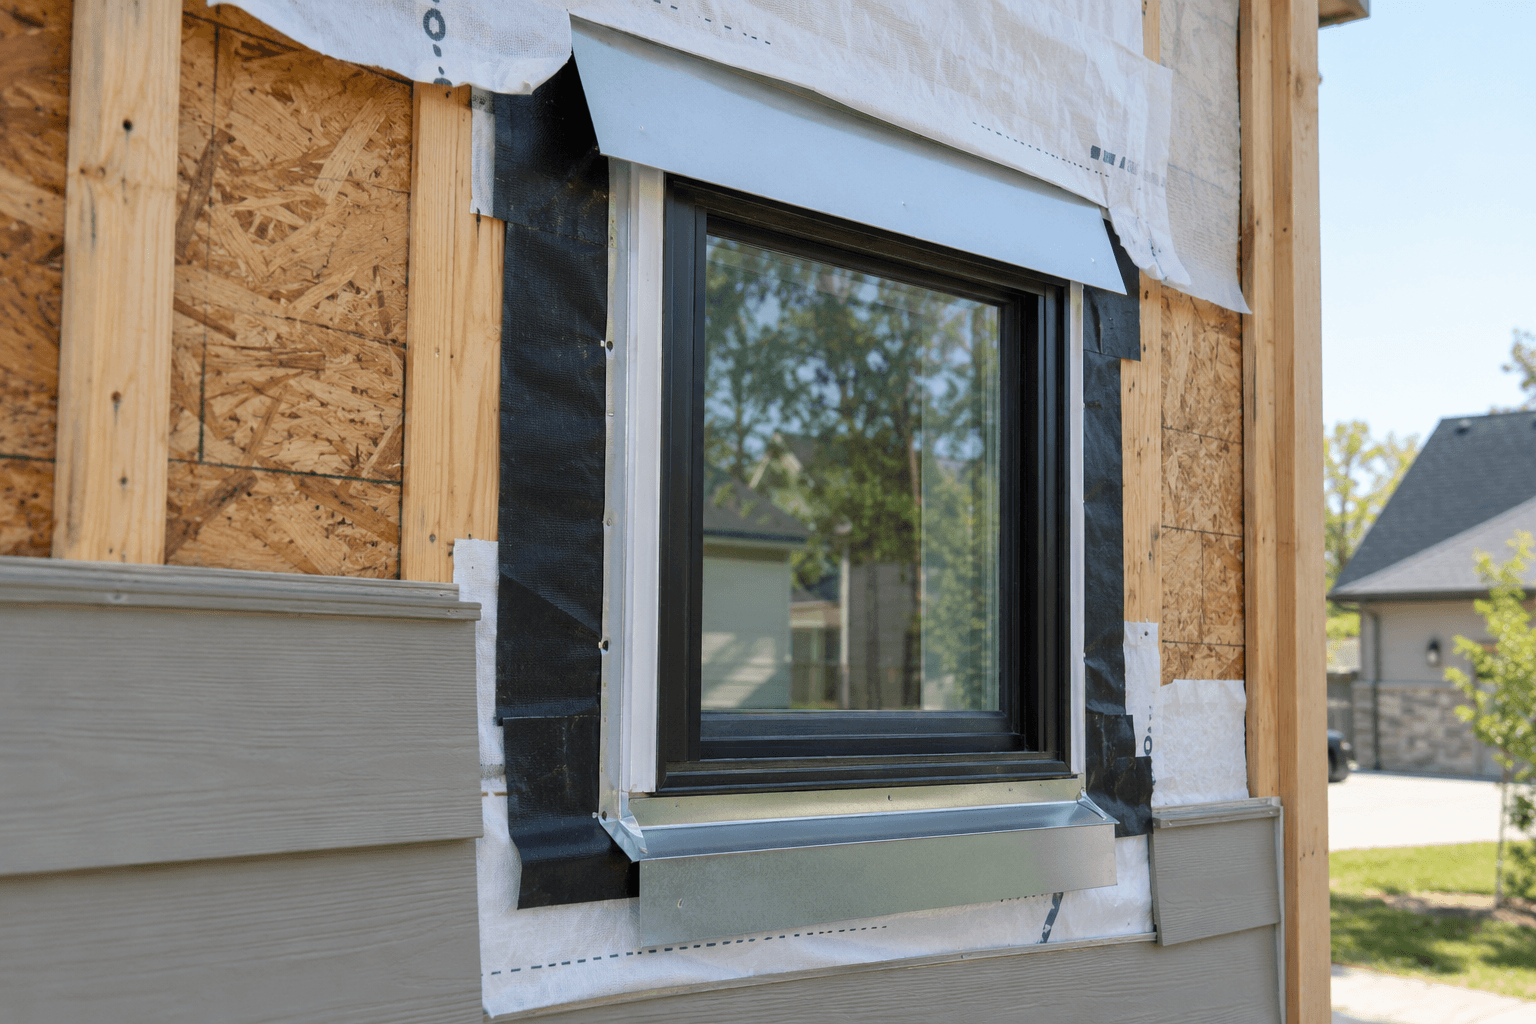
The weather-resistive barrier, often called housewrap, manages water behind the siding. Window flashing needs to connect to that layer so runoff moves toward the exterior. Much of this work is concealed once the trim and siding are installed. A finished joint tells you about its surface condition; access behind it is needed to evaluate the hidden layers.
Sill Flashing Beneath the Window
Sill pan flashing collects incidental water beneath the window and directs it outside. Its corners need continuous protection, and its outlet must connect over the water-resistant layer below the opening. During replacement work, the condition of the sill also matters. Flashing needs a sound opening beneath it.
Side and Head Flashing
Side flashing overlaps sill flashing, and head flashing overlaps the sides. The housewrap connects to the flashing to maintain outward drainage. Tape adhesion matters alongside the overlaps. Loose edges, poorly bonded corners, or tears interrupt that connection. These are details to address while the opening is accessible.
A Drip Cap Above the Exterior Trim
Head flashing above the trim directs runoff over its face. The upper connection and the ends need to match the installation detail for the siding, trim, and window. At Tevelde & Co., following manufacturer requirements is part of our installation process, including the moisture barrier, flashing, and required gaps.
The Details We Check on Vinyl and Fiber Cement Siding
Our siding assessments include the trim and flashing around windows. The material already on your house affects the preparation and repair options.
Vinyl Siding and J-Channel
J-channel receives the cut edges of vinyl siding around a window. The tabs and overlaps at its corners help direct runoff through the trim assembly. Separate flashing protects the opening behind it. Vinyl panels also need room to move as temperatures change. Clearances at the receiving trim allow that movement. Caulk packed between the panel ends and the channel interferes with the intended fit.
On our siding evaluations, we examine the window trim and visible flashing before recommending the work. A defect in the receiving trim calls for a different scope from damaged sheathing behind it. Access to the concealed connection is part of that repair plan.
James Hardie Siding and Window Trim
Tevelde & Co. is a James Hardie Elite Preferred Contractor. Our Hardie installation work includes surface preparation and attention to the product’s fastening and clearance requirements. On our Hardie installations, the product instructions govern which joints get sealant and which stay open. One detail that deserves close attention is the clearance above horizontal flashing. For the HardieTrim HZ5 assembly, that gap is 1/4 inch and stays uncaulked to allow drainage.
A nearby siding-to-trim joint designated for sealant has a different purpose. Applying the same caulking pattern to both locations changes how the assembly handles water. Follow the instructions for the specific siding and trim, along with the window manufacturer’s sealing guidance.

How to Maintain Caulk Without Blocking Drainage
Look at the edges of the caulk bead as well as its face. A bead that appears smooth across the middle still needs attention if it has pulled away from the window or trim. For a joint designated for resealing:
- 1) Remove loose or failed sealant without damaging the adjoining finish.
- 2) Prepare the surfaces using the sealant manufacturer’s approved method.
- 3) Use a product compatible with the materials on both sides of the joint.
- 4) Follow its joint-depth, temperature, and curing requirements.
Deep joints often require backer rod behind the sealant to control its depth. The product instructions determine the correct arrangement. Caulk also needs sound surfaces to bond to, so deteriorated wood requires attention before resealing. Check drainage openings separately. Many windows have weep holes near the bottom of the exterior frame. These release water collected in the frame or tracks. Keep them clear of debris and caulk, following the window manufacturer’s cleaning instructions. Bottom-edge sealing also depends on the window’s installation details. Identify the required drainage path before applying sealant there.
What Homeowners Should Check After Nebraska Storms
A spring and fall check helps you notice changes around your windows. After a severe storm, pay attention to the walls that took the strongest wind and rain. Look for shifted trim, damaged siding near window corners, or fresh indoor staining. Include the gutter and nearby roof-to-wall connections above the affected area.
Before cleaning or resealing anything, take photos. Note whether one window leaks or several windows on the same wall show moisture. That pattern helps focus the inspection, although it still needs to be checked against the condition of each opening. For a window that dries between storms, your photos and notes help us understand what was happening when the leak was active.

How Inspection Findings Change the Repair
Our siding repair process starts with finding the cause and checking the surrounding area. The scope depends on the extent of the damage and what needs correction behind the finished surface.
A Serviceable Window With a Flashing Defect
Consider a window that opens properly and has a sound frame, but leaks where the exterior trim meets the wall. If inspection identifies a flashing defect, the repair needs access to that connection. The work might involve removing a section of siding or trim, correcting the flashing, and rebuilding the exterior detail. The window’s condition and the access needed to complete the repair determine whether the existing unit stays in place. This example shows why identifying the entry point matters before choosing a replacement window.
An Opening With a Soft or Deteriorated Sill
Now consider an opening with soft wood at the sill and evidence of repeated wetting. That finding affects the support beneath the window and the surfaces available for flashing. The work needs to address the damaged material and the source of the water. Wet areas also need to dry before the wall is closed. An insert window relies on a suitable existing frame. Full frame replacement exposes more of the opening for repair. The condition of the sill and frame helps determine which approach fits the job.
Why We Review Windows Before Siding Replacement
At Tevelde & Co., our siding assessment includes the existing windows and trim, along with housewrap, flashing, and drainage details. This review helps identify work that should be coordinated before new siding is installed. Once the old siding comes off, we inspect the exposed wall. Depending on what is found, preparation includes repairing damaged sheathing, addressing the weather barrier, or correcting flashing around openings. Our vinyl siding replacement process includes this step before the new panels go up.
If window replacement is also planned, the installation method needs to fit the condition of that wall. Our replacement vs. new construction window guide explains how access to the rough opening affects the options. Before approving the project, ask:
- • Which window and wall details will be exposed for inspection?
- • Who is responsible for connecting the flashing to the weather barrier?
- • How will additional damage be documented and priced?
- • Will photographs be taken before concealed work is covered?
The proposal should make the planned work clear while explaining how findings behind the siding will be handled.
Get a Window and Siding Evaluation From Tevelde & Co.
If a window leaks after rain, share photos of the affected area and tell us when the moisture appears. Let us know about prior caulking, window replacement, or siding work around that opening. Tevelde & Co. serves Omaha and surrounding communities with window and siding services. We evaluate the existing conditions and explain the repair or replacement options based on the opening and the access needed to complete the work.
Request a window and siding evaluation to discuss the leak and the details that need inspection.